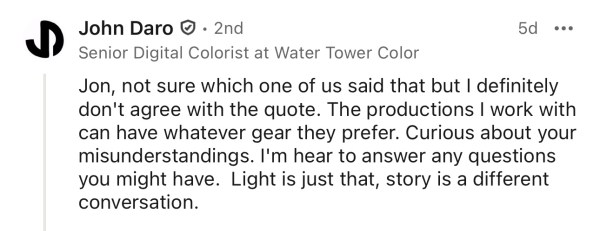
The Incident: We shared a post on LinkedIn featuring Sarah Priestnall’s summary of the 2025 SMPTE “Ask the Colorist” panel, which she moderated. Her summary noted that “many DPs are still not lighting or shooting specifically for HDR – often because they don’t have access to HDR reference monitors on set or in editorial. Until that changes, the... Continue Reading →
A New Framework for Evaluating HDR Quality
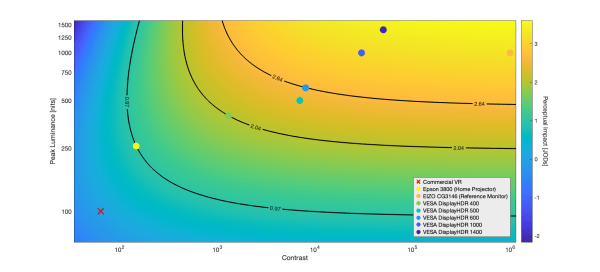
Groundbreaking Research Validates the Central Role of Contrast (August 2025) New research from Meta and NYU, presented at SIGGRAPH 2025, provides the first unified perceptual model for HDR quality, directly validating the core thesis of MaxCLL ≠ HDR Quality. We argued that HDR’s core strength lies in preserving spatial contrast relationships that SDR compresses—not in... Continue Reading →
Fatal Flaws in Yedlin’s HDR Critique
In this analysis, we expose the foundational error underlying Steve Yedlin's critique of HDR: a systematic pattern of conflating fundamentally different technical concepts. While our previous work documented his conflation of EOTFs and color spaces, this piece identifies the core problem: reducing the HDR format to a mere color space. “When it comes to “formats”... Continue Reading →
Shareable Myth-Buster Table
Shareable table to accompany HDR Myths, Terminology-Driven Workflow Errors + Practices.
Steve Yedlin’s Folly
This analysis reveals why Steve Yedlin conflates Rec.2100 with PQ ST 2084, how he overlooks a crucial requirement of WCG, re-examines his "data hog" fallacy, and dismantles his proposed replacement for Rec.2100. The Conflation Image Credit: Steve Yedlin. Debunking “HDR”. BT.1886 is an EOTF, not a color space. SMPTE ST 2084 ≠ ITU-R BT.2100. It... Continue Reading →
The Definition of “SDR in an HDR Container”
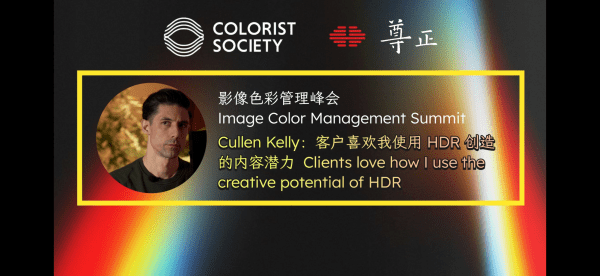
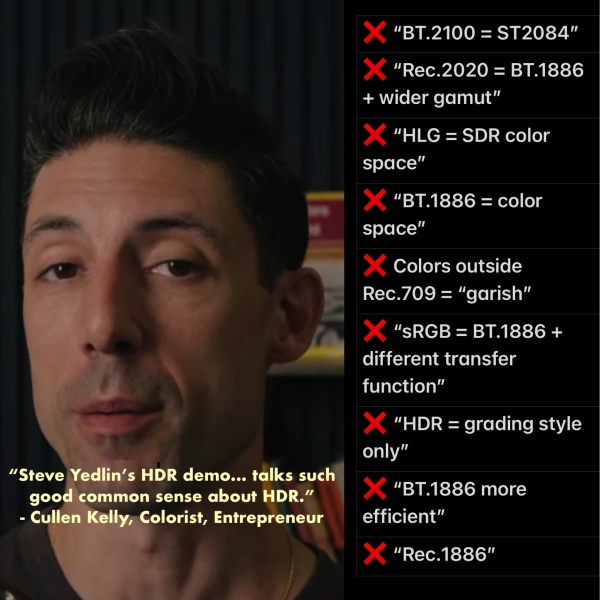
For Cullen Kelly, HDR is just a container for LDR aesthetics. In a livestream, Kelly explicitly instructs his followers to ignore HDR’s potential: “Many of you guys have probably seen Steve Yedlin's HDR demo... that talks such good common sense about HDR... Fundamentally for me, I don't want HDR versus SDR to determine where my... Continue Reading →
The Limitation Dogma
"The inherent process of printing an image... you are destroying dynamic range. That's the job... This is actually part of what makes images work... I actually want these things to clump together into the bottom, the middle, and the top." — Cullen Kelly Cullen Kelly recently gave a masterclass on the necessity of contrast and... Continue Reading →
A Case Study in Intellectual Surrender
BEFORE: “The move to HDR is as significant as any shift in the history of motion imaging… It represents a fundamental improvement to the way we approach and talk about image mastering, one that better reflects the native language of light and photography.” — Cullen Kelly, pre-Yedlin AFTER: “HDR is just a standard. HDR doesn’t... Continue Reading →
The BT.1886 Fallacy
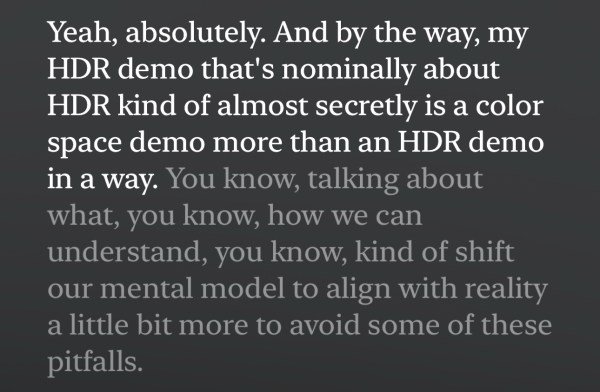
“My HDR demo that's nominally about HDR kind of almost secretly is a color space demo more than an HDR demo in a way.” Steve Yedlin, Team Deakins Podcast This statement is the key to understanding the critical error at the root of all HDR misinformation. The Breakdown 1. The Root Fallacy: BT.1886 is a... Continue Reading →
The SDR-First Workflow Crime
Nearly all misconceptions about high dynamic range (HDR) video stem from SDR misconceptions, chief among them being that BT.1886 is a color space. From this fallacy, an entire ecosystem of bad practices takes root. If you believe BT.1886 is a color space, you’ve got no framework to understand PQ or HLG. You’ll design invalid tests... Continue Reading →
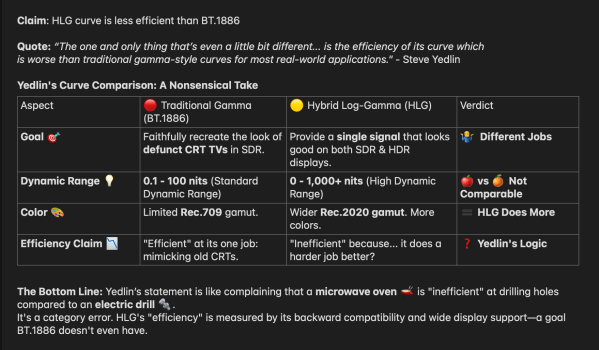
Yedlin: HLG “Inefficient”
Let’s talk about efficiency. Steve Yedlin, ASC, claims the HLG curve is “less efficient” than traditional gamma (BT.1886). This comparison demonstrates why that claim is a category error. Yedlin compares apples to oranges. They’re designed for entirely different purposes. Efficiency depends on the goal: HLG’s goal—delivering a future-proof, backward-compatible HDR signal—is something BT.1886 was never... Continue Reading →
The Cult of Personality
We’ve just added a new entry to the misinformation “dossier”. It demanded a new category of its own: “The Cult of Personality”. The gaslighting, the mangling of tech specs, the refusal to consult the standards documents, and the scapegoating of manufacturers were all bad enough; but the monetization just might be the worst! Category 8:... Continue Reading →
Steve Yedlin’s 8-Bit PQ Deception
“So, everything right now is 10-bit or higher going to the monitors. And both of these look totally smooth. But what I’m gonna do now is, I’m gonna chunk it to 8-bit. And you see how bad that is? That’s the HDR… I mean, it’s actually terrible. We’ve lost the illusion of a smooth gradient... Continue Reading →
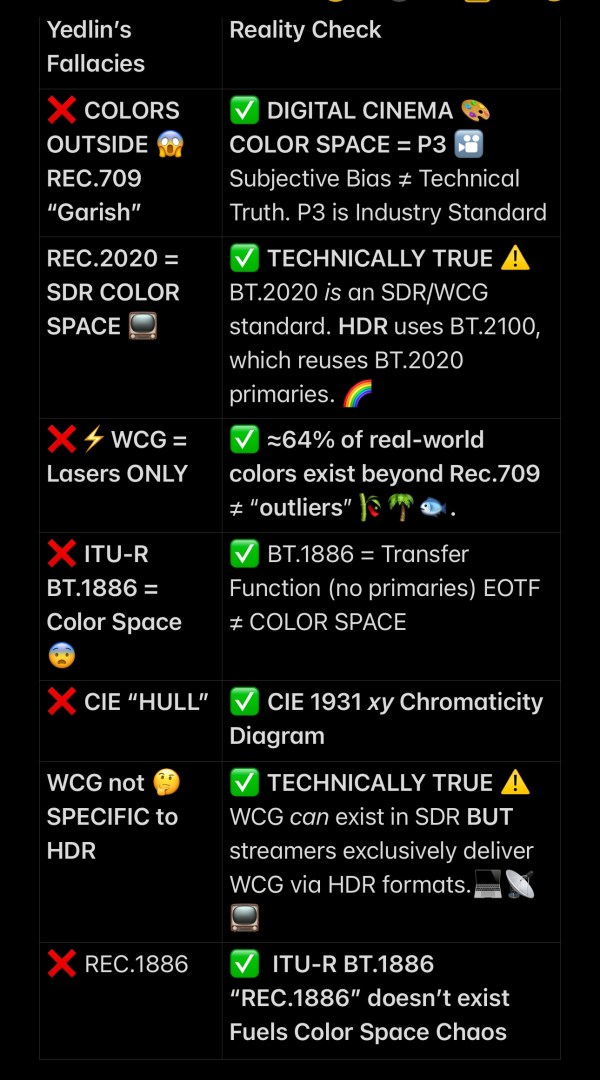
🚨 COLOR SCIENCE FACT CHECK: YEDLIN vs REALITY 🚨
When a famous DP spreads technical myths, we fact-check the claims! Here's the verdict on 7 key arguments from Steve Yedlin's controversial color science presentation: ❌ YEDLIN'S CLAIM:"Colors outside Rec.709 = GARISH"✅ REALITY CHECK:Digital cinema = P3 🎬Subjective bias ≠ technical truth YEDLIN'S CLAIM:"Rec.2020 = SDR color space"✅ TECHNICALLY TRUE ⚠️ BT.2020 is an SDR/WCG... Continue Reading →
Debunking the Debunker: Steve Yedlin’s Color Science Contradictions Exposed
Exposing Steve Yedlin's Contradictions on Color: P3 Workflows vs. Rec.2020 Misrepresentations Steve Yedlin’s "Debunking HDR" presentation misrepresents color science through factual inaccuracies, contradictory statements, and deceptive framing—particularly by attacking Rec.2020 while ignoring industry standard P3-D65. This analysis corrects his errors while emphasizing that creative flexibility—not dogma—should guide color workflows. I. Misrepresenting Color Gamuts &... Continue Reading →
A Diagram Even A 5th Grader Can Understand
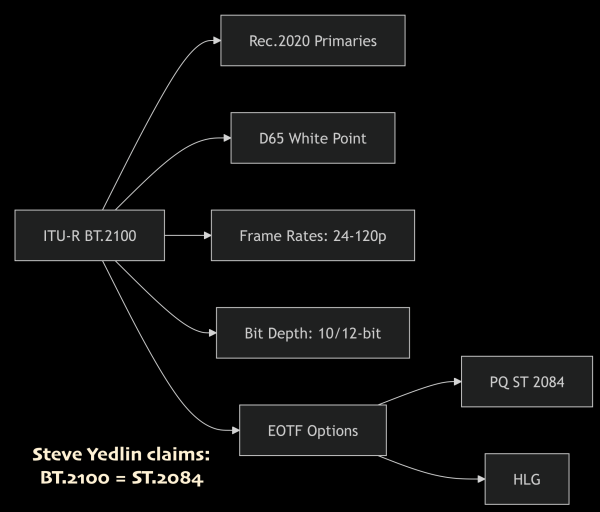
In his long-winded, error-filled rant “Debunking HDR,” disgraced cinematographer Steve Yedlin claims that ITU-R BT.2100 = SMPTE ST2084. That is categorically false: SMPTE ST2084 (PQ) is an EOTF. BT.2100 is the ITU-R standard for UHDTV (HDR/WCG) defining--among other things--Rec.2020 primaries, white point and EOTF options (PQ/HLG). In spite of its dangerous inaccuracies, Yedlin’s presentation has... Continue Reading →
Color Science Gaslighting Bingo
Teaching color science? Arm students with these gaslighting bingo cards. When someone:❌ Conflates EOTFs & color spaces❌ Claims "Rec.2100 = ST 2084"❌ Says "HDR is just brightness!"→ MARK YOUR CARD → OPEN THE SPECS → DEFEND THE CRAFT. 🎯 TOOL TIP: Use the generator to CUSTOMIZE cards for your class!→ Add local jargon (e.g., "¡El... Continue Reading →
Steve Yedlin’s PQ ST2084 Fallacies – Shareable Table
Yedlin’s PQ Myths vs. BT.2390 Reality 💥 Next time someone asserts PQ is logarithmic🧨 Says BT.1886 is more efficient🤯 Claims ST2084 = BT.2100 Show them ITU-R BT.2390 🧐 Full analysis + ITU receipts 📲 Shareable phone-sized table 🎤 PQ discussion begins at ~1:07:00 in Yedlin’s “Debunking HDR” presentation
Claim-Reality Analysis of Steve Yedlin’s Arguments Against PQ (ST2084) Using ITU-R BT.2390
Let’s cut through the noise: Steve Yedlin’s critique of PQ ST.2084 misrepresents its design, testing it in ways it was never meant to be used. Using the ITU’s own playbook (BT.2390), we’ll separate his claims from reality—exposing critical errors that invert the truth about HDR efficiency. Yedlin's Claim on PQ Efficiency Yedlin asserts: "HDR needs... Continue Reading →
Debunking the Myth: HDR Not Responsible for Flat Picture
YouTuber Claim: “The modern obsession with high dynamic range is why we rarely get shots that look this cool anymore.” ❌ (Source: X) Quote: “There is an element to digital cameras that I think is contributing to the grey, sludgy aesthetic and it’s these three little words: High Dynamic Range.” - Patrick Tomasso Reality Check:... Continue Reading →
