https://daejeonchronicles.com/2024/07/11/solved-samsung-tv-hdmi-black-level-grayed-out/ The other day, we thought we'd hit upon a solution for the grayed out HDMI black level settings on our Samsung S90C QD-OLED, but it still behaves unpredictably when receiving a signal over HDMI and it isn’t always possible to do anything about it. Sometimes HDMI Troubleshooting works, sometimes it doesn’t. For now, if... Continue Reading →
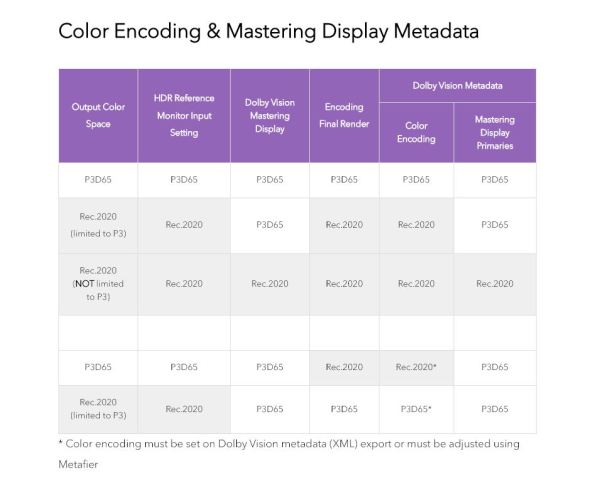
Clearing Up Rec. 2020 (P3-D65 Limited) Confusion
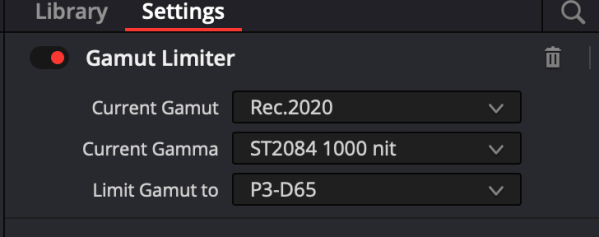
“Using a P3-D65 CST followed by a Rec.2020 CST does not limit the gamut to P3. Since this is a requirement by all studios and clients today, we recommend using a Rec.2020 CST followed by a P3-D65 Gamut Limiter which will constrain the color gamut to P3 within the Rec.2020 container.” — Aby Mathew, Dolby... Continue Reading →
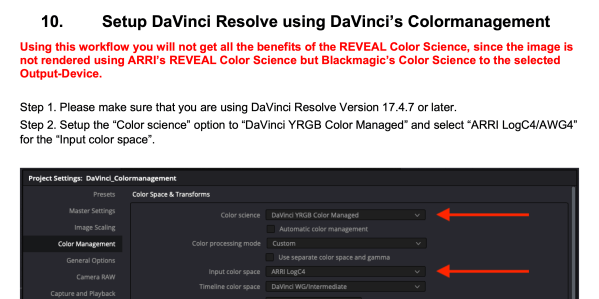
HLG For Social Media Using MacBook Pro With Apple Silicon: DaVinci Resolve Studio 19 Settings
https://youtu.be/VoTrassfzzs The following are our preferred project settings for delivering HLG HDR to YouTube. 1. Display HDR Video (P3-ST2084) 2. Preferences. Decode Options. Decode H.264/H.265 using hardware acceleration. 3. Preferences. Use 10-bit precision in viewers if available. Use Mac display color profiles for viewers. 4. Color Management settings. Color science may be DaVinci YRGB (for... Continue Reading →
How To Work With Cullen Kelly’s LUTs in DaVinci Resolve Studio 19
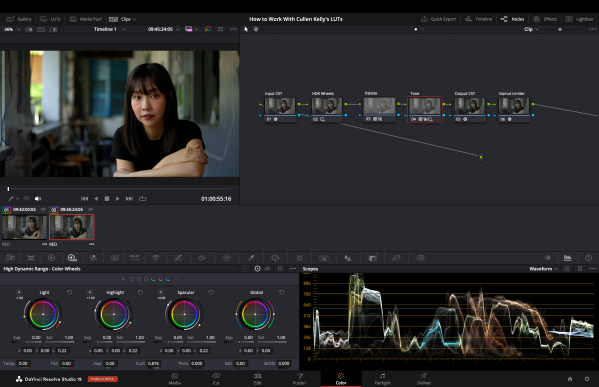
The following workflow is for Cullen Kelly's discontinued Core Elements Creative LUT Pack, but is applicable to his Voyager LUT Pack and film print emulation LUTs as well. https://youtu.be/0ERXpfUuRQ4 Description of the Core Elements Creative LUT Pack (discontinued) from Cullen Kelly's website: Create studio-grade cinematic looks Tailor to your vision Use for HDR, SDR, and... Continue Reading →
All Of Our Quick Start Video Tutorials Under One Roof
RAW Convertor doesn't convert the ProRes RAW files into the color space and gamma that they were shot in. Rec709, P3-60 and Blackmagic Design Film are the only options to develop the RAW files, not Slog3 and S.Gamut 3 Cine. Is there a possibility to fix this in a future update or am I maybe... Continue Reading →
Compare Dolby Vision Derived SDR Version To HDR10 Video
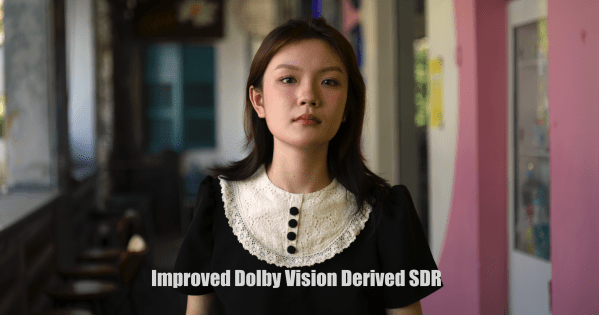
https://youtu.be/H_SChOvwIW0 HDR10 version Dolby introduced an improved tone mapping analysis algorithm that first appeared in DaVinci Resolve Studio 18.6. If you'd like to compare the Dolby Vision derived SDR version to the HDR10 video above, click here. As far as we can tell, it only appears to be playable on Dolby Vision enabled devices, because... Continue Reading →
Dolby Vision Analysis Tuning Feature in Resolve Studio 18.6
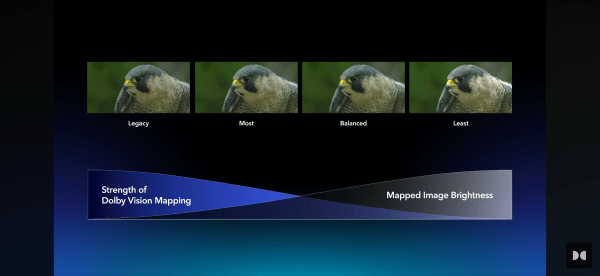
This feature introduces a new and improved analysis algorithm that allows colorists to select the strength of highlight retention and the amount of mapping applied. Users can now choose from a predefined set of spatial filters. Selecting the "Legacy CM4 L1" option matches the analysis of the original CMv4 algorithm. Older projects from software versions... Continue Reading →
How To Calibrate LG OLED To P3-D65 With Calman
David Abrams, Senior Calman Product Manager at Portrait Displays, explains: “We’ve already set up our system for HDR and we’ve already done BT.2020 but the monitor has a second memory based on its color space flag. So remember, we were talking about the info frame flag that content sends to the display to say, ‘I’m... Continue Reading →
Dolby Vision Profile 8.4 Update
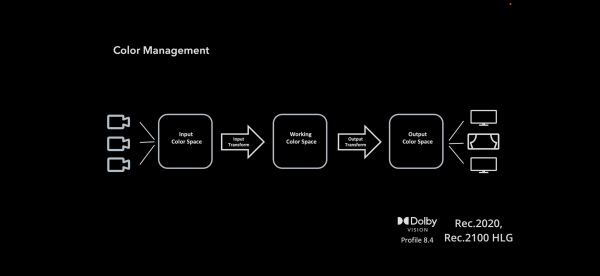
First of all, color management. We'd stick with one of Dolby Professional's recommendations: DaVinci YRGB Color Managed (auto) Color Processing Mode - HDR. Output Color Space - HDR HLG. DaVinci YRGB Color Managed (auto unchecked) Color Processing Mode - HDR Rec.2020 HLG. Output Color Space - Rec.2020/Rec.2100 HLG "For the Color Management setting, there are... Continue Reading →
Gamut Rings OFX Plugin For DaVinci Resolve Available For Purchase
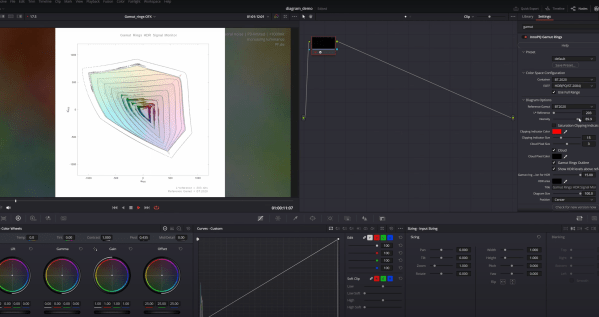
https://youtu.be/QHl7FcWa-ng?si=1U8CfuFauNL-jP9T A game-changing innovation in HDR visualization. Discover the revolutionary tool, first presented at IBC 2023. Good news & bad news. First, the good news: Florian Friedrich teamed up with Dr. Kenichiro Masaoka, the inventor of gamut rings, to develop a standalone OFX plugin for DaVinci Resolve, which comes bundled together with the InnoPQ HDRmaster... Continue Reading →
DaVinci Resolve 18.6 Audio Update
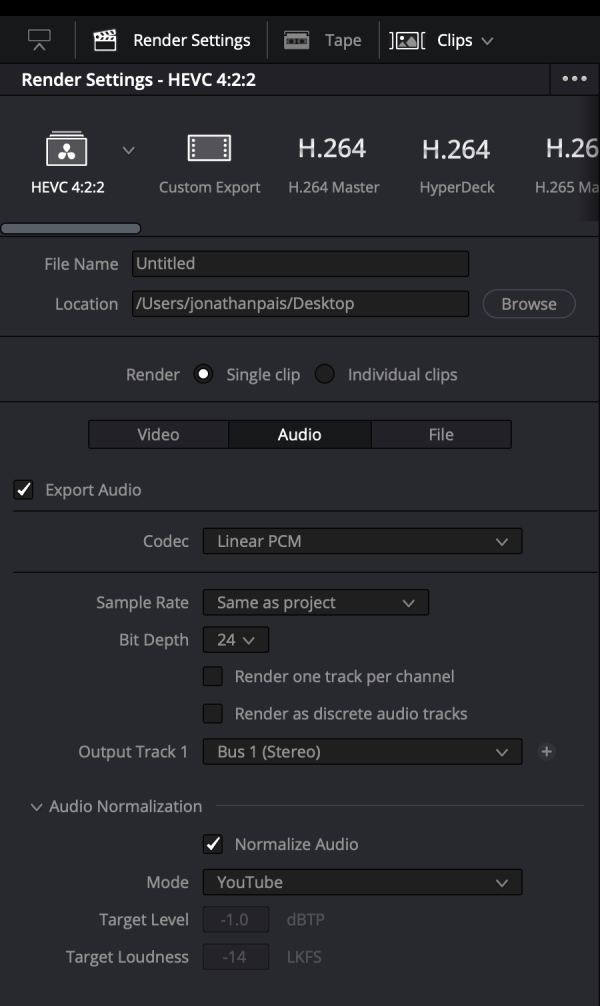
DaVinci Resolve 18.6 adds support for target audio loudness standards by Disney and YouTube with target audio loudness standards on renders: This new feature makes it easy to create renders that comply with specific loudness standards, such as those used for broadcast and streaming. These standards control loudness with a new meter effect, render settings,... Continue Reading →
Gamut Rings Plugin To Be Made Available for DaVinci Resolve

Dr. Masaoka is developing plug-ins, the first for DaVinci Resolve, to allow live gamut ring display. 🔥 source
Graeme Nattress on Highlight Roll-Off
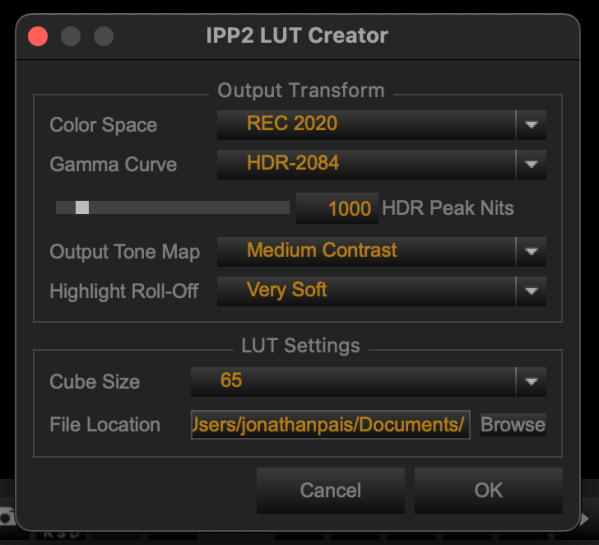
Graeme Nattress was kind enough to answer some questions we had about highlight roll-off in RED's Output Transform LUT. According to the Red.com website, ‘very soft’ highlight roll-off compresses highlights the least, while 'hard' compresses highlights the most. But 'very soft' makes HDR footage resemble SDR and ‘hard’ allows highlights to sparkle. So, what exactly... Continue Reading →
RCM IPP2 Still Broken
We still can't recommend using a Resolve Color Managed workflow with RED's IPP2 output DRT because it causes lifted blacks that can be seen in the title cards that precede and follow videos made in this manner. This doesn't happen when using RED's output transform LUT in a node-based color managed workflow, which is what... Continue Reading →
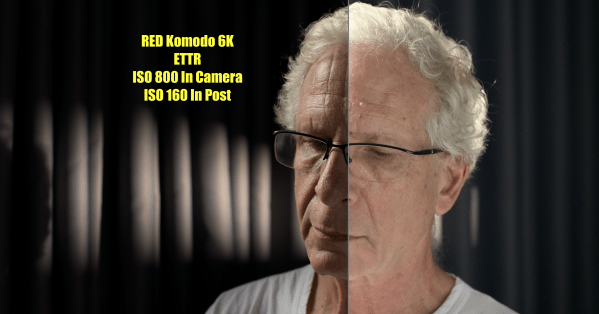
Making Curves for ETTR Footage

So, we've exposed to the right in order to reduce noise in the image; we've chosen the logarithmic color space of the hero camera as our working color space; and our timeline luminance matches the output color space. How are we to normalize the footage to prepare it for grading? There are a number of... Continue Reading →
RCM: We Tested Some DRTs. Here’s What We Learned

In order to learn how DRTs affect the image, an R3D clip was processed three different ways in DaVinci Resolve Color Management: (1) with input and output DRTs set to DaVinci; (2) with input and output DRTs set to NONE; (3) with output DRT set to RED IPP2 with medium contrast and very soft highlight... Continue Reading →
Dolby Now Leaves DRTs In RCM Up To Colorists’ Discretion
It was around a month ago that we reached out to the super-helpful Nate McFarlin, Sr. Content Engineer at Dolby Laboratories, to ask why it is that Dolby insists upon setting input and output DRTs to NONE in RCM, to which he replied that it was to avoid any of Resolve's color science from being... Continue Reading →
Everything we know about timeline color space in one post
We just revised the section on working color spaces in the Monster Guide, so we're sharing it here. When it comes to post-processing, using the fewest number of transforms and working at the highest available bit depth in a native color space greater than the display color space are key to preserving the greatest image... Continue Reading →
Dolby Engineer Answers Our Most Pressing Questions!
Update: Dolby changes stance on DRTs. We asked Nate McFarlin, Senior Content Engineer, Dolby Laboratories, a couple questions that have been troubling us for a while now: (1) Why exactly is it that Dolby insists on input and output DRTs being set to NONE in a Resolve Color Managed workflow; and (2) When mastering Rec2020... Continue Reading →
