Cullen Kelly has contributed a tutorial entitled How to Fix the Dreaded “Video Look” Using DaVinci Resolve to the Frame.io Insider blog where he shares several tips that we've used with great success since following him on his YouTube channel Grade School; but we advise against making an S-Curve as he recommends if you're exposing to the... Continue Reading →
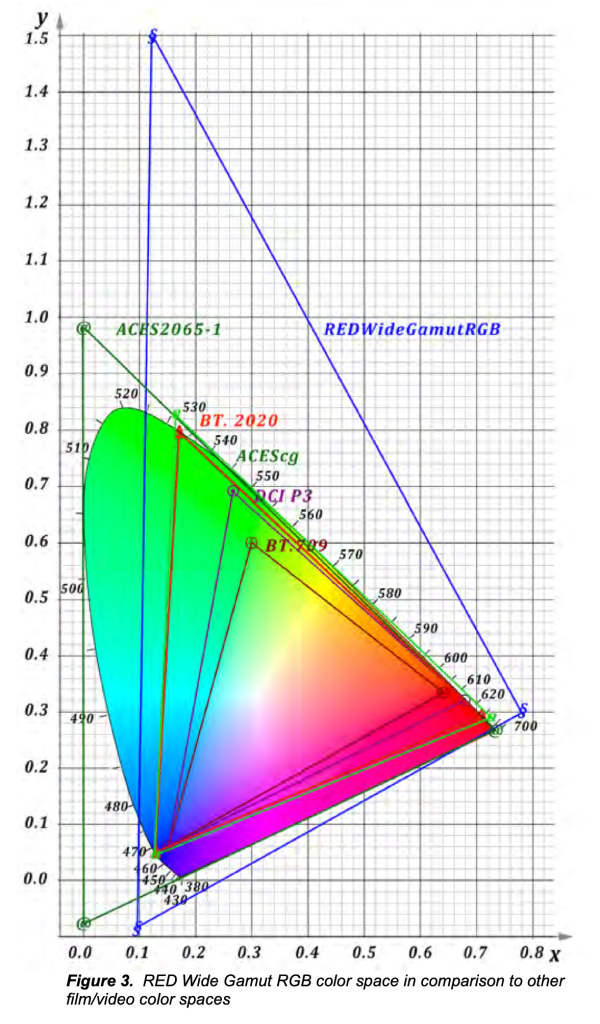
Working Color Space: REDWideGamutRGB/Log3G10, ACES or DaVinci Wide Gamut?
When it comes to post-processing, using the fewest number of transforms and working at the highest available bit depth in a native color space greater than the display color space are key to preserving the greatest image quality. So, should you be changing your timeline color space to DaVinci Wide Gamut Intermediate or not? Three... Continue Reading →
DaVinci Resolve 18.5 Public Beta Color Page Additions
Per-Timeline Resolve Color Management Timelines using custom settings now allow you to override color management settings on a per timeline basis. This allows setting of independent timeline and output color spaces per timeline along with other color management properties. Any existing custom timelines are automatically initialized to color management settings from the project. Set Composite... Continue Reading →
DaVinci Resolve: Prevent Power Windows From Appearing On External Monitor
In earlier versions of DaVinci Resolve, to prevent power windows from appearing on an external monitor, we went to View > Window Outline and checked Only UI. That option has been moved to within the three dots menu in the Color page viewer as shown in the photo below.
Sony Color Management Updates
Here are the revised settings for Sony S-Gamut3.Cine/S-Log3 and ProRes 4444 XQ Rec.2100 ST2084 (from ProRes RAW), the chief difference being no more input or output DRT. Only restrict output color space to P3-D65 if the mastering display is calibrated to P3. Set 'HDR mastering is for' according to the capabilities of the mastering display.
How to save trimmed R3D files in DaVinci Resolve
Go to File > Media Management > Press Start Mission completed! The .RDC folder containing the R3Ds and .rtn as well as the .drt have been saved.
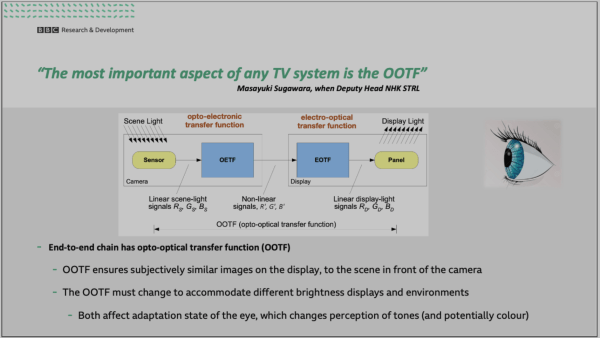
“The most important aspect of any TV system is the OOTF”
In their Quick Start Guide to DaVinci Resolve Studio, Dolby Vision says to set the input and output DRTs to none on the color management page, which is why we're guessing that they wouldn't be overly fond of choosing tone-mapping in Resolve's OFX CST either - but there's no prohibition against OOTF that we're aware... Continue Reading →
Nonsense About Display-Referred Workflow
If you even think about this for a second, you realize it doesn't make sense. “If we start with the concept of a display referred workflow, […] it basically comes down to this idea of working in a color space that matches the output display. In other words, the physical device on which the end... Continue Reading →
Scene Referred vs. Display Referred Part II
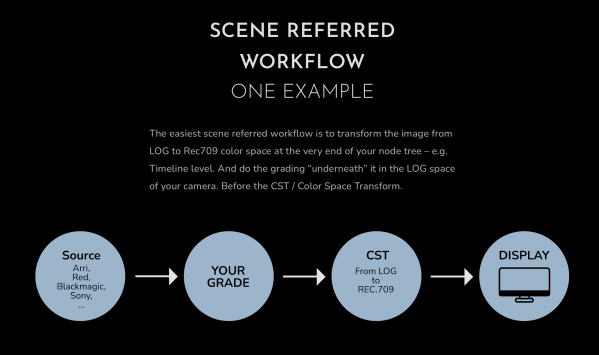
What's the difference between scene-referred and display-referred grading? Stefan Ringelschwandtner, on his website Mononodes, explains it very clearly with simple diagrams. He writes: "The easiest scene referred workflow is to transform the image from LOG to Rec709 color space at the very end of your node tree – e.g. Timeline level. And do the grading... Continue Reading →
What Timeline Working Space Do Dolby Colorists Prefer?
Thomas Graham, Head of Dolby Vision Content Enablement at Dolby Laboratories: Can you all just tell me in the sense of what your timeline working space is that you find suits you best to create HDR imagery? Now I know there's a lot of controversy about working sort of in PQ or working in camera... Continue Reading →
Walter Volpatto on Why He Doesn’t Do Secondaries on Skin
Walter Volpatto on why he doesn't do secondary corrections on skin. "I do not do [a] secondary on the skin. For me, when I do balance, it means that the main actress - balance, color, skin tone - has to be right. Then I do everything else. There is no reason for me to make... Continue Reading →
We Couldn’t Come up With a Title for This Post
Something doesn't seem quite right here. In this video with Armando Ferriera where Shane Ruggieri explains how to work with Sony footage, the renowned authority on HDR does something peculiar... "The first thing that I would do is I would come in - let me turn this this monitor off - I would first come... Continue Reading →
DWG, ACES or Native Camera Color Space?
We've already made it abundantly clear that we're not overly fond of transforming the log color space of our camera to DaVinci Wide Gamut or ACES but that we could understand wanting to bring all of your footage into a common working color space if you're dealing with a multi-camera shoot. It ensures that the... Continue Reading →
DaVinci Wide Gamut Or Native Color Space?
When it comes to post-processing, using the fewest number of transforms and working at the highest available bit depth in a native color space greater than the display color space are key to preserving the greatest image quality. So, should you be changing your timeline color space to DaVinci Wide Gamut Intermediate or not? To... Continue Reading →
Rec.2020 P3 Limited to YT: The Definitive Test?
For the past six months, we’ve been uploading Rec.2020 ST2084 (P3-D65 Limited) videos to YouTube, but it appears that many are still operating under the assumption that Rec.2020 videos constrained to P3 should not be uploaded to the video sharing platform. In order to settle this question once and for all, we recorded a billboard... Continue Reading →
A Few More Changes to Komodo Post Workflow
We've made a few more changes to the RED Komodo post-workflow, including adding Rec.2020 ST2084 (P3-D65 Limited) for those working with a display calibrated to P3-D65, such as the MBP (2021). From the DaVinci Resolve user manual: Gamut Limiter Lets you limit the gamut to a specified standard. Useful in situations where the delivery color... Continue Reading →
Depth Map in DaVinci Resolve Studio 18
A few days ago, over at our facebook group, I had some pretty harsh criticism for a DP teaching a painfully obvious way to use power windows in DaVinci Resolve to create a halo effect around the subject's head in order to make them stand out. A better way - particularly if you've got a... Continue Reading →
RED Komodo Grade Reveal
The clip incorporates many of the techniques discussed in our Monster guide - the most comprehensive and up-to-date free resource on the Internet for HDR10 workflows in DaVinci Resolve Studio 18 that shows how to use false color to nail exposure every time; how to use HSL to selectively target problematic areas for the best... Continue Reading →
Easiest Way to Fix Skin Tones in DaVinci Resolve
We’ve squandered years watching useless YouTube tutorials on balancing shots and correcting skin tones, futzing around with the color wheels, power masks and hue versus hue, but it's always taken forever, we were always guessing and we were never completely satisfied with the results. So here's what we’re doing now - it's completely predictable, repeatable... Continue Reading →
Learn HDR & DV From Senior Colorist Cullen Kelly
Cullen Kelly will be hosting a free training session with Blackmagic Design entitled‘Exploring HDR & Dolby Vision with DaVinci Resolve’Aug 18, 2022 10:00 AMPacific Time (US and Canada)This “ watch & learn” session will teach you how to create and deliver a finished Dolby Vision Master from Resolve 18! Register now at https://us02web.zoom.us/webinar/register/WN_Q6k-gU7MSjm-woSNvoXmEQ Agenda items... Continue Reading →


