
Part I: The State of HDR Film Emulation LUTs
Part II: Moving Beyond Traditional Film Print Emulation
Part III: CineD Review of Dehancer Pro
Part IV: Dehancer Print Film Profiles
Part V: Negative and Print Clarified
The final fundamental to grading photographically is to use a good print stock. This concept is largely forgotten today but for a century or more, print stock played a key role in defining the look of a film, providing a consistent baseline of creative contrast and color imagery and helping visually unify the images. – Cullen Kelly
Color has been an obsession here for as long as we can remember. With the Sony a7s III in particular, however much we play around with the tint and temperature controls, the hue vs. hue curves, the color warper and the color wheels, colors still look video-ish. Would film emulation LUTs be the answer? While there are countless LUTs on the Internet, precious few are compatible with an HDR workflow. Colourlab.Ai‘s Look Designer LUT portfolio has been available for three years running. We had a chance to play around with it a bit and the results looked promising, though it was exceedingly difficult to deal with the contrast and the prominent watermark on the trial version meant we could only work with it for a few seconds for fear of ruining our display. There’s also Cullen Kelly’s Colloid, his version of what an ideal film stock would be like. We tried it out briefly and were pleased with it, if not overwhelmed. The plugin is simply not nearly as feature-rich as the others, some of which offer dozens of film emulations, in addition to grain, halation, bloom, gate weave and so on. Unfortunately, we didn’t spend enough time with Colloid to determine how it transforms other colors aside from skin tones – something we hope to rectify very soon. Last but not least is Dehancer, a plugin offering what might very well be the most complete, flexible, cost-effective solution – and best of all, it’s not a subscription service. Below is a glance at the various developers’ products.
ResolveFX

In April 2024, DaVinci Resolve Studio 19 introduced Film Look Creator, which includes halation, bloom, film grain, flicker, gate weave, and film gate.
Colourlab.Ai
Colourlab.Ai’s Look Designer 2.0, a plugin for DaVinci Resolve, features a very deep collection of film emulation LUTs and works on macOS, Windows and Linux. A few of the many print stocks available include: Fuji CP 3510, Fuji Eterna CI 8503, Kodak Vision Color Print 2383 and Kodak Vision Color Print 2393. Negative stocks include Agfa XT 125, Fuji Eterna 8543 Vivid, Fuji Reala 8592, Kodak 5203 Vision 3 50D, Kodak Ektachrome 7294 Reversal and Kodak Kodachrome 40 7268. A tutorial explaining how to use Colourlab’s LUTs can be found here. Descriptions of the many film stocks, along with titles of some of the feature films shot on them, can be found here. Unfortunately, the trial version has gargantuan watermarks, rendering it fairly useless. The subscription service runs USD $24/month or $249/year. Try out the free trial version here.

Update, 22.02.2022: Release of public beta of version 2.0 with several new features, a new user interface, support for Adobe Premiere and Final Cut Pro, optimization for Apple silicon and new pricing.
New features include:
- Ai Powered Auto Color
- Color Tune
- Show Look Library
- Smart LUTs
- Improved Camera Matching
Perhaps the biggest practical consequence of film versus digital capture is on the aesthetics of our captured image. Digital sensors are designed to accurately capture raw image data and they’re getting better and better at this all the time. Film has a fundamentally different design: it imparts aesthetics on our image that were not present in the original measurable light of the scene. Why is this? First, because film is an imperfect analog format and in fact, a lot of the qualities that we associate with film, that we find desirable about film – like grain and halation and gate weave – are technically imperfections in this analog system. Second, film is engineered to do more than to give you a neutral, accurate capture of your scene data. It’s trying to enhance the color of your image, and after nearly a century of engineering, it does a damn good job of it. So, if we choose to shoot digital, does this mean that we’re forever barred from the aesthetics of film negative? Absolutely not! All the qualities that I’m talking about can be measured, modeled and reproduced digitally. What it does mean is that it’s on us to do this and of course to do it well.
– Cullen Kelly
Colloid 2.0
Colloid 2.0 has been overhauled with a streamlined UI for more intuitive and precise control and faster performance and features next-gen synthetic print stocks purpose-built for HDR and wide gamuts. It’s compatible with DaVinci Resolve Studio 17 and later and boasts native support for Davinci Wide Gamut, ACES, RED IPP2, Arri LogC, and film scans. There is a free 7-day trial, including for users who’ve tried previous versions. The Master Bundle consists of all Colloid tools: Print, Exposure, Points, Contrast Plus and Saturation Plus and download includes five user-adjustable DaVinci Resolve OpenFX DCTLs with automatic installer, PowerGrades for recommended node tree and free product updates for the life of the subscription. There is no renewal commitment – you may cancel your subscription at any time. A monthly subscription runs $99.00, quarterly is $249.00 and yearly is $899.00. If that sounds extortionate, Cullen Kelly’s color grading tutorials will help up your game even without any plugins or LUTs.
Note 27.12.2022 Colloid has been discontinued.

Update, 01.01.2022: This is absolutely massive! Cullen Kelly has released a FREE Kodak 2383 print film emulation LUT that works in both ACES and in DaVinci Wide Gamut as well as in SDR or HDR. We tried it on some clips and it’s the real deal! Head on over to his website and pick yours up now.
Core Elements Creative LUT Pack
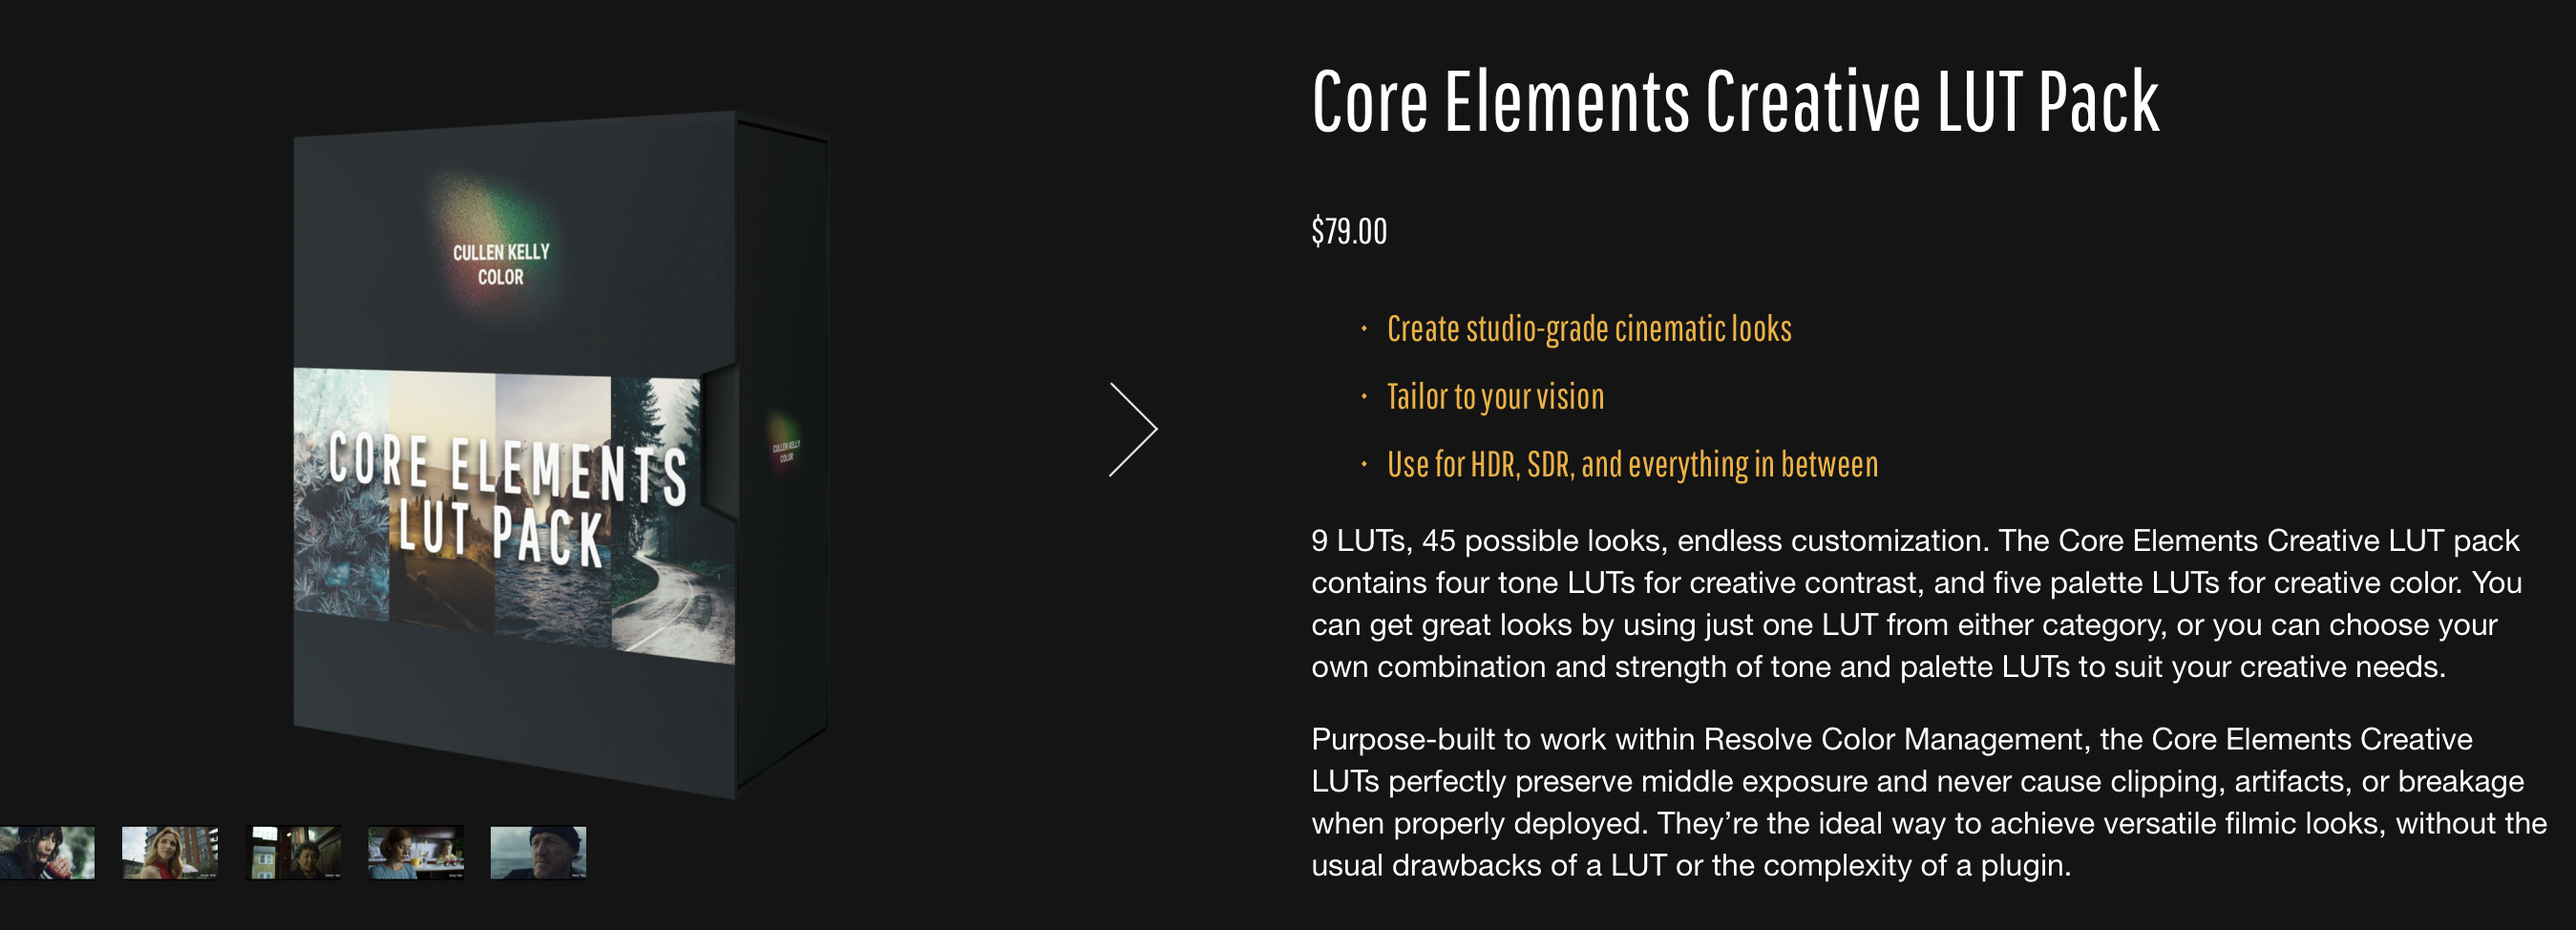
Cullen Kelly has just announced the release of a new LUT pack that is compatible with an HDR workflow. From his website:
- Create studio-grade cinematic looks
- Tailor to your vision
- Use for HDR, SDR, and everything in between
9 LUTs, 45 possible looks, endless customization. The Core Elements Creative LUT pack contains four tone LUTs for creative contrast, and five palette LUTs for creative color. You can get great looks by using just one LUT from either category, or you can choose your own combination and strength of tone and palette LUTs to suit your creative needs. The Core Elements Creative LUT pack sells for just $79.00.
Note: The Core Elements LUT Pack is no longer available.
The Voyager LUT Pack

Cullen Kelly released the Voyager LUT pack at the start of 2023. The Essentials pack sells for $79.00 and includes the following:
- The 17 core Voyager LUTs to grade faster and deliver high-end work on any job
- Color Grading Mini-Course so you can make stunning images out of anything you’re grading with
- “Tasting Notes” .pdf with detailed instructions on how to install your LUTs alongside descriptions of what each LUT does and recommended ways to use them
The Pro version goes for $129 and includes:
- Everything in the Essentials Pack
- 24 additional Look Design components to create the exact look you and your client wants quickly and easily on any project
- PowerGrade versions of all 17 Voyager LUTs, revealing exactly how I used the Pro Pack pieces to build the Voyager set

Cullen Kelly’s offering a free Fuji 3510 film emulation LUT for use with ACES and DaVinci Wide Gamut. We can’t honestly say we’re really fond of the flat, yellowish-green look, but it might work for one of your projects – and free HDR compatible LUTs aren’t exactly falling out of the sky!
Dehancer

Dehancer, an OFX plugin suite for film-like color grading and film effects in DaVinci Resolve and Final Cut Pro, is compatible with macOS and Windows and comes in no fewer than eight flavors: a Pro and Lite version, as well as individual plugins for grain, bloom, breath (with gate weave), false colors, halation and a photo edition with a single frame per clip export limitation. The Pro package includes input camera profiles, 62 film profiles with print options, CMY color head (a subtractive color correction tool), film grain, bloom, halation, gate weave, defringe tool for simple chromatic aberration control, vignette, false colors, a LUT generator and ACES support and runs $399.00. The Lite version comes with all the above except for halation, gate weave, LUT generator and ACES support and costs $199.00. The Dehancer website has extensive documentation, including answers to FAQs, in-depth articles explaining the different features in Dehancer, the ACES workflow, how they built their library of over fifty film profiles and even a free book on color in photography! Unlike many of the other plugins listed here, there are also a number of in-depth online tutorials. Dozens of videos graded with Dehancer can be watched here. We spent a little time with Dehancer and found several of the warmer film profiles that prioritize skin tones – Cinestill 800T, Kodak Pro Image 100, Fujicolor Pro 400H and Kodak Gold 200 – quite lovely; and the film grain, which looks convincingly like it is integrated into the image, is preferable in our opinion to the effect in DaVinci Resolve Studio, which appears to be overlaid on top of the image. Another bonus is that, unlike some of the other plugins, Dehancer’s film emulations don’t heap on gobs of contrast. For those still on the fence, you can upgrade any valid License to any more expensive one, within the same host application, whenever you like; there are 10% off promotions everywhere; and a free trial version for Windows or macOS is available here. We purchased the Lite version ourselves for $179.10.
Update 12.10.2021 Dehancer OFX 5.0.0 Beta 7 for macOS and Windows offers several improvements, chief among them the ability to “print” on the print film Kodak Vision 2383. The update is for the Pro version only.
- Print profiles with Target White setting
- Kodak Vision 2383 Color Print Film profile
- Kodak Professional Endura Glossy Color paper profile
- Cineon Film Log support
- DVR WG/Rec.709 source input
- Source white balance (Temperature and Tint compensation)
- Optimizations

Here is a description of the print film profiles, from the Dehancer blog:
In the latest version of Dehancer OFX 5.0.0, in the Print parameter group, we have added a choice of the print mediums:
- Linear
The characteristics of the print medium are not applied. Only a ‘pure’ profile of the selected film is used, without the influence of the characteristics of photographic paper. This parameter is used by default. It is similar to the the way film profiles worked in all previous Dehancer versions, including the very first one. - Cineon Film Log
Film, selected in the Film group, is ‘printed’ into Cineon film scan format. For example, if you are using Kodak Vision 3 250D negative film and Cineon Film Log printing, the Dehancer output will be Cineon-scanned imitation of 250D. This parameter makes it possible to ‘print’ our negatives outside Dehancer, in additional nodes after it, if it is required for whatever reason. For example, to prepare a file for printing on Arrilaser or other film printer. - Kodak 2383 Print Film
Film, selected in the Film group, is ‘printed’ onto Kodak Vision Color Print Film 2383. - Kodak Endura Glossy Paper
Film, selected in the Film group, is ‘printed’ onto Kodak Endura Premier Glossy Paper. In the previous versions of Dehancer, it was not possible to obtain this print option, because before this print medium characteristics were subtracted from a film profile.
This looks like a significant update.
Is sampling accuracy important?
It would seem that there were and still are many programs, plug-ins, LUTs and other solutions with film emulation used by millions of people, although most of developers rely on scanning negatives with linear image processing. Looks like these ‘imprecise’ solutions work well, allowing one to enrich the ‘soulless’ digital picture in a certain way. After all, users still further adjust the contrast, brightness, saturation, white balance and other image parameters. Is it really so important to super-precise the original profile, if it will suffer from further massive digital correction? We believe accuracy is important. First of all, we want to use specific film color solutions because they have been carefully designed and revised for decades. For example Kodak spent 34 years and $2 billion (old index value) on lab research for the purpose of film development and improvement. Film manufacturers are working for decades on the subtlest nuances of color rendering, rightly considering it important for perception. If we want to use this aesthetic ‘heritage’ with digital image processing, it makes sense to simulate films and processes as precise as possible. It’s a complex task to recreate real film features, no matter how we distort them later. Further correction multiplies the initial inaccuracy. The aesthetic error of 1 mathematical unit during sampling, can easily turn into 10 units after digital post-processing. Finally, the digital correction tools themselves are basically relying on technical (rather than aesthetic) principles. This usually leads away from aesthetically acceptable result, rather than bringing us closer to it.
By the way, such tools can also be built upon the instrumental measurements of analogue processes. That’s how, for example, Exposure, Contrast and Analogue Range Limiter tools are implemented in Dehancer video plugin, allowing us to significantly reduce the digital ‘inaccuracy’ in post-processing, making it possible to work with color relations even in a face of significantly increased contrast, brightness changes and overall massive correction. – How we build film profiles, Dehancer Blog
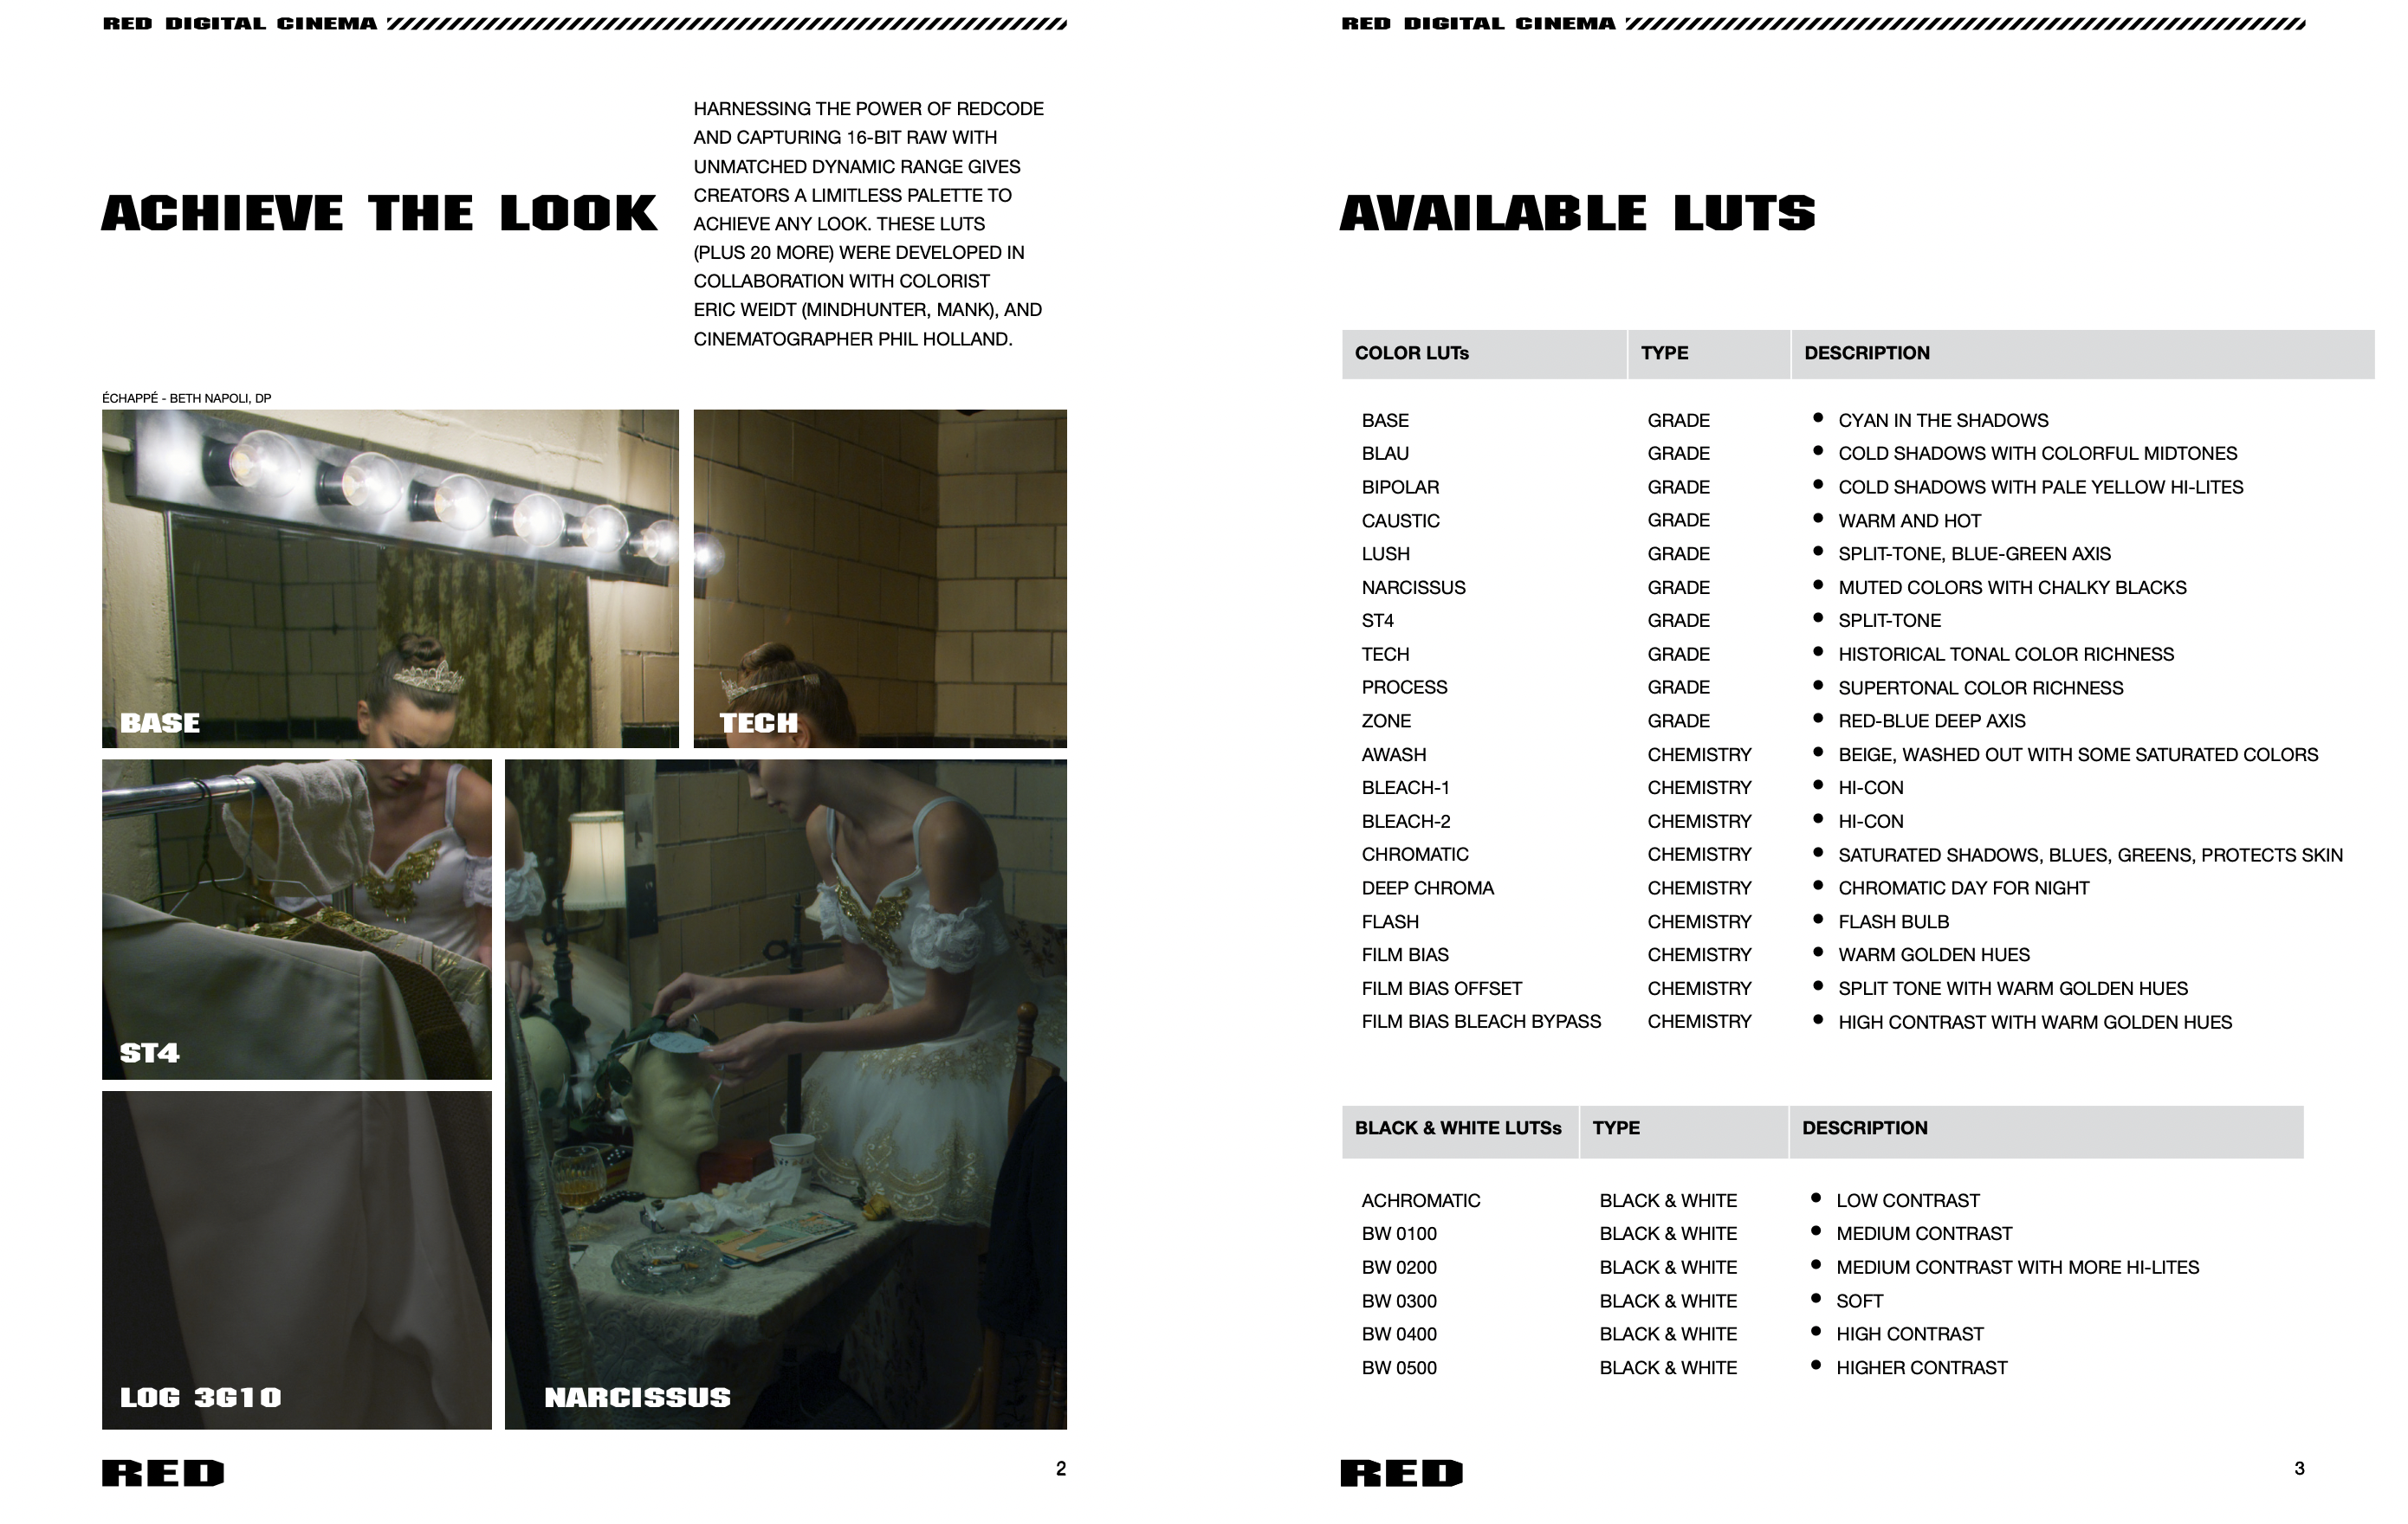
philmColor R3

From Phil Holland’s website:
What is philmColorR3?
philmColor is an expansive collection of LUTs built around the RED IPP2 Color Workflow. The LUTs range from creative looks to useful tools for colorists in post. It’s been a journey since the last release in 2017. Thousands of productions have used these LUTs on set, in post, and I’ve loved seeing the BTS grabs of the LUTs loaded on set. philmColor’s success has allowed me invest a lot of time into people’s requests, project looks, and more. A great deal of testing by individuals, studios, and productions commenced as well as creating more looks for my own projects. This led to an opportunity to even create the small selection of LUTs you get inside RED’s new DSMC3 cameras. But I assure you that is merely a taste of the feast I’ve included in PCR3.
As many have figured out you can also use philmColor with other cameras by transforming your incoming footage into the REDWideGamutRGB Color Space and Log3G10 Gamma. There’s an emphasis on cross camera combatility for this release as it’s pretty common to have a few different cameras on set.
Motion Picture Film has remained the source of my inspiration and you will find hints of familiar hues, tones, and density that stretch across modern through vintage Kodak and Fujifilm stocks. As alwasy the goal was and is to produce digital stocks useful to the modern filmmaker that will work with a variety of lighting conditions and exposure methods. At key, under key, high key, or ETTR exposure methods work very well with these LUTs.
In Release 3 you get a total of 540 new LUTs with the purchase of philmColor as well as the previous 178 from philmColor R2. A daunting collection of LUTs, but I assure it’s not about the number, I’ve been working on this release for almost 4 years now to create a sensible and long lasting collection of looks for RED’s IPP2 workflow.
I’ve created philmColor R3’s LUTs to be used as a RED IPP2 grading toolbox and is essentially a modular LUT workflow. As such I’ve organized the LUTs not only into individual categories, but also generally the order I suggest using them in you choose to cook up more complicated looks. LUT workflow is an interesting topic industry-wide, but there’s many reasons why many productions choose this pathway and it comes down to control and consistency, which is an important aspect of professional image making. Colorist can take these LUTs and build out looks as well as just take inspiration from the direction they are taking things for a final grade. Many ways to work really. My goals are flexibilty, versatility, and compatibility.
philmColor R3 is compatible with HDR workflows and costs $300.00.
RED IPP2 Creative LUTs
The RED Creative LUT Kit, developed by Phil Holland and Eric Weidt (David Fincher’s favorite colorist), features a number of interesting looks and should be compatible with most NLEs. The download pack is entirely free and the LUTs may also be copied to a CFast card and imported into the RED Komodo. Because they contain no conversion of color space or linearity, the LUTs can be used in both SDR and HDR workflows and, as they were tailor made for IPP2, unlike some LUTs and plugins we’ve tried, they do not pile on a truckload of contrast and saturation. Unfortunately, with the RED Komodo, it is not possible to use the same LUT to monitor in SDR on your smartphone while sending an HDR signal out over HD-SDI to your HDR monitor. Get your free LUTs here.
Ravengrade Film Emulations, Looks & Tools Plugin

The list of HDR WCG compatible film emulation LUTs and plugins is steadily growing, the most notable recent entry being Ravengrade from Lowepost, a DaVinci Resolve plugin created by an impressive roster of color scientists and colorists, including Mitch Bogdanowicz, Juan I. Cabrera, John Daro, Douglas Delaney, Florian Utsi Martin, Mark Todd Osborne and Bianca Rudolph.
First, the downsides: there’s no trial version, it’s a subscription-based model, sample footage and reviews are practically non-existent and documentation is rudimentary. On the plus side, the credentials of the creators are remarkable, several of the looks are said to have been used on a number of high-end productions, the plugin is uncomplicated to use but has a wealth of sliders in the control panel to achieve the desired look and there are three color management configurations available: rec.709, which lets Ravengrade handle it for you, RCM or ACES. And perhaps most importantly, the Standard version is not going to cost you one of your kidneys.
The Standard version, which includes the Cinelook Plugin and Mira PowerGrades, features free updates, free support and is compatible with Mac, Win and Linux runs $129 per user, with renewals costing $69/year. The Complete package includes CineLook, Daro Cinema Looks, MIRA, and Master Tone, a plugin with tone curve adjustments, features access to future product releases, free updates, Mac, Win and Linux compatibility and free support and runs $249 per user, with renewals for $129/year.
Visit the Ravengrade website to learn more.
Sony Venice 2 LUT Pack

Sony has teamed up with some heavy hitters – Josh Pines (Titanic, Saving Private Ryan, The Revenant), Chris Kutcka (Kill Bill, Pirates of the Caribbean), Jason Fabbro (Captain Marvel, Thor: Ragnorak, Ready Player One) and Tony D’Amore (Fargo, Elementary, Daredevil, Mayans MC) – to create a series of custom LUTs for their flagship cinema camera, the Venice 2. The LUTs can be used with any Sony camera that records S-Log3/S-Gamut3.Cine and those created by Josh Pines are available in both rec.709 and (gasp!) HDR rec.2020 PQ flavors. Best of all, they’re free.
A note regarding 3D LUTs for HDR BT.2100 PQ
According to at least one study, in order to achieve a comparably error-free 3D-LUT to those used for SDR, a LUT size larger than 55x55x55 is required for 12-bit HDR (Rec.2020 ST2084). Most LUTs are 33x33x33 and the only camera we’re aware of that accepts 65x65x65 3D LUTs is the Arri Alexa 35. 65x65x65 3D LUTs can also be created inside REDCINE-X Pro.
“In 10-bit SDR, in order to achieve unnoticeable interpolation errors using the trilinear interpolation method, a 3D-LUT larger than 41×41×41 is necessary. However, using tetrahedral interpolation a 31×31×31 3D-LUT is sufficient. In 12-bit HDR, in order to achieve unnoticeable interpolation errors, a 3D-LUT larger than 72×72×72, is required while a 3D-LUT size of 55×55×55 is sufficient if using the tetrahedral interpolation. The saturated and dark images resulted in a much larger minimum size 3D-LUT to achieve a JND<1 pointing to the possibility that ICtCp is likely not suited for dark images. Further studies are needed with emerging new color difference metrics to evaluate the 3D-LUT size for these types of images. Finally, we determined that reducing the bit-depth from 12-bit to 10-bit will require a 3D-LUT 50% larger on average to maintain a comparable image quality”. – A survey on 3D-LUT performance in 10-bit and 12-bit HDR BT.2100 PQ, JD Vandenberg, Stefano Andriani, SMPTE, 2018
Part I: The State of HDR Film Emulation LUTs
Part II: Moving Beyond Traditional Film Print Emulation
Part III: CineD Review of Dehancer Pro
Part IV: Dehancer Print Film Profiles
Part V: Negative and Print Clarified

Nice article about the current LUTs market.
Thanks, Val. I’m seriously considering purchasing Colourlab’s Look Designer just so I can upload samples to YouTube. Haven’t been able to shoot any models since Vietnam’s been in lockdown.
Have you already tried PhilColor R3 LUTs?
It has been designed for Red Cameras workflow but it can also be used with other manufacturers like Sony, Canon, Fuji and Nikon.
It could be interesting but so expensive!
I haven’t tried philmColor yet, I’m just playing around with the LUTs built into the Komodo to see which ones I like best.
Of course, all the LUTs of Red already a great source.
I just downloaded the samples and tried some (REC709 however).
It seems great.